
Image Source: www.breakthroughbasketball.com
DIY: How To Install In Ground Basketball Hoop
Thinking about installing an in-ground basketball hoop? Yes, you can install an in-ground basketball hoop yourself with the right tools, planning, and a bit of elbow grease. This guide will walk you through the entire process of setting up your own backyard basketball court, from choosing the right spot to making those final adjustments.
Planning Your Backyard Basketball Setup
Before you even think about digging, careful planning is key. A well-planned installation ensures your hoop is safe, stable, and in the perfect location for endless hours of fun.
Choosing the Best Location
Your backyard’s layout and your playing style will influence where your hoop goes.
- Space Requirements: Think about the playing area. You’ll need enough room for dribbling, driving to the hoop, and retrieving missed shots. A regulation basketball court is 94 feet long by 50 feet wide, but you can adapt this to your space. Aim for at least 30-40 feet of length for a decent playing area.
- Clearance: Ensure there are no overhead obstructions like tree branches, power lines, or roof overhangs. You also need clearance around the hoop for safety.
- Surface: A flat, level surface is ideal for the concrete foundation. Avoid areas with significant slopes or underground utilities that could pose a problem.
- Drainage: Consider how water will drain away from the hoop area to prevent puddles and ice in winter.
Selecting the Right In-Ground Basketball Hoop
In-ground basketball hoops offer the most stability and authentic playing experience. They come in various types, each with its own installation considerations.
- One-Piece Pole Systems: These are the most common and generally the easiest to install. The pole is a single piece that extends from the ground to the backboard.
- Two-Piece Pole Systems: These have a lower pole section that extends from the ground and an upper section that attaches to it. They are often used for adjustable-height hoops and can be a bit more complex to assemble and install securely.
- Direct Mount vs. Anchor Kit:
- Direct Mount: This involves directly setting the pole into a concrete base. It’s the most permanent and strongest option.
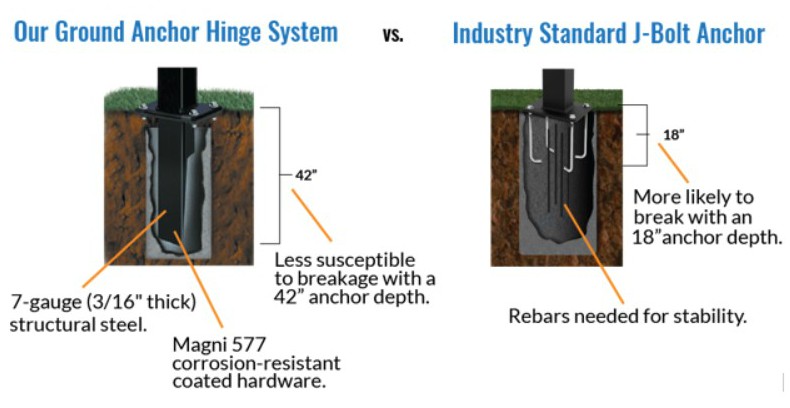
- Anchor Kit: This system uses a steel anchor that is set in the concrete, and the hoop pole then bolts into the anchor. This allows for easier removal or replacement of the pole if needed and can sometimes simplify the pole installation process.
Gathering Necessary Tools and Materials
Having everything ready before you start will make the process much smoother.
- Tools:
- Post hole digger or shovel
- Level (4-foot recommended)
- Tape measure
- Wrench and socket set
- Drill with appropriate bits
- Wheelbarrow or concrete mixing tub
- Shovel for mixing concrete
- Safety glasses
- Work gloves
- Concrete float or trowel
- Water source
- Measuring bucket for water
- Screwdrivers
- Materials:
- In-ground basketball hoop kit (includes pole, backboard, rim, hardware)
- Concrete mix (you’ll need enough for your specific hole size)
- Gravel (for drainage at the bottom of the hole)
- Water
- Anchor kit (if your hoop uses one)
- Sand (optional, for leveling)
- Spray paint or stakes for marking the hole location
Step-by-Step: In-Ground Basketball Hoop Installation
This section details the core steps for a successful installation.
Step 1: Digging the Basketball Hoop Pole Hole
The foundation is critical for a stable hoop.
- Mark the Location: Use spray paint or stakes to mark the exact center of where your hoop pole will go. Measure and double-check to ensure it’s centered in your desired playing area and at a safe distance from fences or other structures.
- Determine Hole Size: The size of the hole is crucial and depends on your hoop’s manufacturer specifications. Generally, for a standard 3.5-inch diameter pole, you’ll need a hole that is 3 to 4 feet deep and 10 to 12 inches in diameter. Always consult your hoop’s manual for exact dimensions.
- Excavate the Hole: Use a post hole digger or shovel to start digging. Dig straight down. As you dig deeper, periodically check the depth and diameter.
- Add Gravel for Drainage: Once you reach the desired depth, add about 6 inches of gravel to the bottom of the hole. This helps with drainage, preventing water from pooling around the base of the pole and potentially causing corrosion or instability.
- Check for Utilities: Crucially, before you start digging, contact your local utility locating service (like 811 in the US) to have underground lines marked. This is a vital safety step to avoid damaging gas, water, or electrical lines.
Step 2: Setting the Pole and Anchoring
This is where the main structure takes shape.
- For Direct Mount Systems:
- Position the Pole: Place the basketball hoop pole into the center of the dug hole.
- Initial Shoring: Use temporary supports (like 2x4s and stakes) to hold the pole upright and in the correct position. Ensure the pole is plumb (perfectly vertical) using your level.
- Anchor Bolts (if applicable): Some direct mount systems require anchor bolts that are set in the concrete. If yours does, place these bolts according to the manufacturer’s instructions, ensuring they are positioned correctly to attach the pole later.
- For Anchor Kit Systems:
- Assemble the Anchor Kit: Follow the kit’s instructions to assemble the anchor. This usually involves a base plate with several rods or feet that will be embedded in the concrete.
- Position the Anchor: Place the assembled anchor kit in the center of the hole, ensuring it is level and at the correct height. The anchor’s mounting plate should be flush with or slightly above ground level.
- Temporary Supports: Use temporary supports to hold the anchor in place while you pour the concrete.
Step 3: Pouring the Concrete Basketball Hoop Base
The concrete is the heart of your installation.
- Prepare the Concrete Mix: Follow the instructions on your concrete bag for the correct water-to-mix ratio. You want a consistency that is workable but not too soupy. Mix in a wheelbarrow or a large mixing tub.
- Pour the Concrete:
- Direct Mount: Carefully pour the concrete into the hole around the pole. As you pour, use a shovel or trowel to work the concrete around the pole and eliminate air pockets. If you have anchor bolts, ensure they remain in place and are not moved by the concrete.
- Anchor Kit: Pour concrete into the hole, filling it around the anchor kit. Work the concrete to ensure it fills all voids around the anchor.
- Leveling the Concrete:
- Direct Mount: Use your level to ensure the pole remains perfectly vertical as you fill the hole with concrete. Adjust temporary supports as needed. You may want to create a slight slope away from the pole at the surface to help with water runoff.
- Anchor Kit: Ensure the anchor’s mounting plate is level. Smooth the surface of the concrete around the anchor with a trowel.
- Curing Time: Allow the concrete to cure completely. This typically takes 48 to 72 hours, but can be longer depending on temperature and humidity. Do not attempt to attach the hoop components until the concrete is fully cured.
Step 4: Attaching the Backboard and Rim
With the base set, it’s time to build upwards.
- Read Your Manual: Every hoop system is slightly different. Thoroughly read the manufacturer’s instructions for attaching the backboard and rim.
- Assemble the Backboard and Rim: This often involves attaching the rim to the backboard first, using the provided hardware. Make sure all bolts are tightened securely.
- Mounting the Backboard Assembly to the Pole:
- Direct Mount: The backboard assembly usually attaches directly to the pole. You may need to slide a mounting bracket onto the pole or bolt the backboard directly to pre-drilled holes on the pole.
- Anchor Kit: The hoop pole will have a flange or a place to bolt the backboard support arm. Attach the backboard assembly to this flange or support arm.
- Tighten All Hardware: Ensure all bolts and nuts are securely tightened. Use a wrench and socket set.
Step 5: Rim Height Adjustment and Final Checks
The final touches to get your backyard basketball setup game-ready.
- Adjusting Rim Height: Most in-ground basketball hoops allow for rim height adjustment. This is typically done via a crank mechanism or by repositioning bolts on the extension arm.
- Standard Height: The regulation rim height is 10 feet.
- Adjusting: Consult your manual for the specific method to adjust the height. Ensure the mechanism is functioning smoothly and securely locked in place at your desired height.
- Final Leveling and Stability Check:
- Use your level again to confirm the pole is still plumb.
- Gently push on the backboard and rim to check for any wobbling or instability. If there’s any movement, you may need to re-check the concrete and pole connections.
- Clean Up: Remove any temporary supports, tools, and excess materials from the installation site.
Table: Common Hoop Pole Diameters and Minimum Hole Sizes
| Pole Diameter | Minimum Hole Diameter | Minimum Hole Depth |
|---|---|---|
| 3.5 inches | 10 inches | 36 inches |
| 4.0 inches | 12 inches | 42 inches |
| 5.0 inches | 14 inches | 48 inches |
Note: These are general guidelines. Always refer to your specific basketball hoop manufacturer’s recommendations.
Troubleshooting Common Installation Issues
Even with careful planning, you might encounter a snag.
- Hole Too Small: If you realize your hole isn’t deep or wide enough, you’ll need to dig it out further before pouring concrete.
- Pole Not Plumb: If the pole isn’t perfectly vertical, you can often adjust temporary supports before the concrete sets. If the concrete has already set slightly, you might need to carefully chip away at the concrete on one side and add more on the other to correct the angle. This is difficult and may require redoing the concrete.
- Concrete Mix Too Wet/Dry: If the mix is too wet, it will be soupy and may not set as strongly. If it’s too dry, it will be difficult to work with and may not form a solid mass. Adjust the water content slowly during mixing.
- Instability After Curing: If the hoop feels wobbly after the concrete has cured, the most common cause is insufficient concrete or inadequate curing time. You may need to reinforce the base or consider digging it up and re-pouring a larger, deeper foundation.
Frequently Asked Questions (FAQ)
Q1: How deep should I dig the hole for an in-ground basketball hoop?
A1: Generally, you should dig the hole 3 to 4 feet deep. However, the exact depth depends on the specific hoop model and manufacturer recommendations, and it should be at least 10% of the pole’s above-ground height.
Q2: What is the best type of concrete for a basketball hoop base?
A2: Standard concrete mix (like Sakrete or Quikrete) is suitable. You’ll want to mix it to a workable consistency as per the bag’s instructions.
Q3: Can I use an anchor kit for my in-ground basketball hoop?
A3: Yes, using an anchor kit is a common and often recommended method. It provides a strong foundation and can make pole replacement easier.
Q4: How do I ensure the pole is perfectly straight?
A4: Use a long level (4-foot is ideal) on multiple sides of the pole as you pour and set the concrete. Temporary braces are essential to hold the pole in place while the concrete cures.
Q5: What if I hit a rock or underground obstruction while digging?
A5: If you hit a large rock that you can’t remove, you may need to adjust the location slightly or dig around it. If you encounter any signs of underground utilities, stop immediately and contact the locating service.
Q6: How long does the concrete need to cure before I can use the hoop?
A6: Allow at least 48-72 hours for the concrete to cure. For best results and maximum strength, waiting a week is even better before putting the hoop under heavy use.
Q7: How do I adjust the rim height on my new hoop?
A7: Most in-ground hoops have a crank or bolt system for height adjustment. Refer to your hoop’s specific instruction manual for the correct procedure.
Q8: Can I install an in-ground basketball hoop by myself?
A8: Yes, it is possible to install an in-ground basketball hoop yourself, but it is a physically demanding job and often made easier with the help of at least one other person, especially when handling the pole and backboard.
By following these detailed steps and paying close attention to safety and precision, you can successfully install your in-ground basketball hoop and create a fantastic addition to your backyard for years of fun and athletic activity.