
Can you prevent ankle sprains in basketball? Yes, you can significantly reduce your risk of ankle sprains in basketball through consistent training, proper equipment, and smart playing techniques.
Basketball is a dynamic sport that involves a lot of jumping, cutting, and quick changes of direction. These movements put a lot of stress on your ankles, making them vulnerable to sprains. Ankle sprains happen when the ligaments that support your ankle are stretched or torn. This is most common when your foot lands awkwardly after a jump or when you roll your ankle on the court. Thankfully, with a proactive approach, you can build resilient ankles and stay in the game.
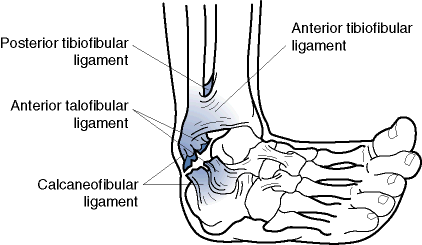
Image Source: capitalareapt.com
Building a Foundation: Ankle Strengthening Exercises
Stronger ankles are less likely to get injured. Focusing on exercises that target the muscles and ligaments around your ankle joint is key. These exercises improve stability and the ability to react to unexpected movements.
Essential Ankle Strengthening Exercises
- Calf Raises (Standing and Seated): These are fundamental for building strength in your calf muscles, which play a crucial role in ankle stability.
- Standing Calf Raises: Stand with your feet hip-width apart. Rise up onto the balls of your feet, squeezing your calf muscles. Hold for a second, then slowly lower your heels back down. You can progress by doing single-leg calf raises or holding weights.
- Seated Calf Raises: Sit on a chair with your feet flat on the floor. Place weights (like dumbbells or a barbell) on your knees, just above your ankles. Lift your heels off the floor, using your calf muscles. Lower them slowly.
- Ankle Eversion and Inversion: These movements target the muscles on the sides of your ankle.
- Eversion (Turning Foot Outward): Sit on the floor with your legs extended. Loop a resistance band around the arch of your foot. Anchor the other end of the band to a stable object or have a partner hold it. Keep your heel on the ground and turn your foot outwards against the resistance. Return slowly.
- Inversion (Turning Foot Inward): Sit in the same position. Loop the resistance band around the outside of your foot. Anchor the band to the opposite side. Keep your heel on the ground and turn your foot inwards against the resistance. Return slowly.
- Dorsiflexion and Plantarflexion: These exercises improve the up and down movement of your foot.
- Dorsiflexion (Pulling Toes Up): Sit with your legs extended. Loop a resistance band around the top of your foot. Anchor the other end. Pull your toes towards your shin against the resistance.
- Plantarflexion (Pointing Toes Down): Sit with your legs extended. Loop a resistance band around the ball of your foot. Anchor the other end behind you. Push your foot downwards, pointing your toes away from you, against the resistance.
- Alphabet Writing: Sit with your feet off the ground. Use your big toe to “write” the alphabet in the air. This helps with fine motor control and strengthens the smaller muscles around the ankle.
Progression for Ankle Strengthening
As you get stronger, you can make these exercises more challenging:
- Increase repetitions or sets.
- Use resistance bands with higher tension.
- Add weights (e.g., dumbbells, ankle weights).
- Perform exercises on unstable surfaces (like a BOSU ball or wobble board).
Gear Up for Success: Proper Basketball Footwear
Your shoes are your first line of defense. The right basketball shoes can provide the support and cushioning needed to protect your ankles.
Key Features of Basketball Shoes for Ankle Support
- Ankle Collar Height: Mid-top or high-top basketball shoes offer more support around the ankle joint compared to low-tops. They help to restrict excessive rolling motions.
- Cushioning: Good cushioning absorbs impact from jumping and landing, reducing stress on your ankles and the rest of your lower body.
- Outsole Grip: A durable rubber outsole with a good traction pattern ensures you can make quick cuts and stops without slipping, which can lead to ankle rolls.
- Midsole Stability: The midsole provides shock absorption and stability. Look for shoes with a firm yet responsive midsole that doesn’t compress too easily.
- Lacing System: A secure lacing system allows you to tighten the shoe properly, ensuring your foot is held snugly and reducing movement within the shoe.
Fitting Your Basketball Shoes Correctly
- Try Before You Buy: Always try on basketball shoes before purchasing.
- Wear Basketball Socks: Wear the type of socks you’ll use when playing to ensure an accurate fit.
- Check for Space: There should be about a thumb’s width of space between your longest toe and the end of the shoe.
- Comfort is Key: The shoes should feel comfortable from the moment you put them on, with no pinching or rubbing.
Enhancing Stability: Balance Exercises for Athletes
Good balance is crucial in basketball. It allows you to maintain control during dynamic movements and recover from awkward landings. This is where balance exercises for athletes come into play, directly improving your proprioception training.
Proprioception: Your Body’s Internal GPS
Proprioception is your body’s ability to sense its position, movement, and balance. After an ankle injury, proprioception can be impaired, making you more susceptible to re-injury. Targeted exercises help retrain this sense.
Effective Balance and Proprioception Exercises
- Single-Leg Stance:
- Stand on one leg with your knee slightly bent.
- Hold this position for 30-60 seconds.
- Progress by closing your eyes, standing on an unstable surface, or performing small movements with your arms or free leg.
- Tandem Stance: Stand with one foot directly in front of the other, heel touching toe. Hold for time, then switch feet.
- Heel-to-Toe Walking: Walk in a straight line, placing the heel of one foot directly in front of the toes of the other.
- Star Excursion Balance Test (SEBT): This involves reaching your foot in various directions from a single-leg stance. It’s excellent for assessing and improving dynamic balance and neuromuscular control.
- BOSU Ball Training: Standing or performing other exercises on a BOSU ball (half exercise ball) challenges your balance and strengthens stabilizing muscles.
Preparing for Action: Dynamic Warm-up Routines
A dynamic warm-up routines are non-negotiable before any basketball practice or game. They prepare your muscles and joints for the demands of the sport, increasing blood flow and improving flexibility. Static stretching (holding a stretch) is best done after activity, while dynamic stretching involves movement.
Components of a Dynamic Warm-up for Ankle Health
- Light Cardio: Jogging, high knees, butt kicks to get the blood flowing.
- Dynamic Stretches:
- Ankle Circles: Rotate your ankles clockwise and counterclockwise.
- Leg Swings (Forward and Backward): Swing one leg forward and backward in a controlled motion.
- Leg Swings (Side to Side): Swing one leg across your body and then outwards.
- Walking Lunges: Step forward into a lunge, keeping your front knee behind your toes.
- Walking Quad Stretch: Pull your heel towards your glute while walking.
- Walking Hamstring Stretch: Keep one leg straight and reach towards your toes while walking.
- Inchworms: Start standing, walk your hands out to a plank position, then walk your feet towards your hands and stand up.
Advanced Training: Plyometric Training for Ankles
Once you have a solid base of strength and balance, plyometric training for ankles can further enhance your explosiveness and ability to absorb force, which is critical for preventing injuries during high-impact basketball movements.
Plyometrics for Ankle Resilience
Plyometrics involve exercises that use a stretch-shortening cycle to produce powerful movements. They train your muscles to react quickly and absorb force efficiently.
- Box Jumps: Jump onto a stable platform, landing softly. Focus on quick ground contact.
- Jump Squats: Perform a squat and then explode upwards into a jump.
- Lateral Bounds: Jump from side to side, landing on one leg and immediately pushing off to the other side.
- Ankle Hops: Simple hops in place, focusing on using your calf muscles and keeping your ankles springy.
- Depth Jumps: Step off a low box and immediately jump as high as possible upon landing. This trains reactive strength.
Important Considerations for Plyometrics:
- Proper Technique is Paramount: Always prioritize form over height or repetitions.
- Adequate Recovery: Allow sufficient rest between sets and sessions to prevent overtraining.
- Gradual Progression: Start with lower intensity and volume and gradually increase as your ankles adapt.
- Pain-Free Movement: If you experience pain, stop the exercise.
Mastering Movement: Landing Mechanics in Basketball
How you land after a jump significantly impacts your ankle health. Poor landing mechanics in basketball can put undue stress on your ligaments, leading to sprains.
Safe Landing Techniques
- Bend Your Knees and Hips: As you land, bend your knees and hips to absorb the impact. This distributes the force across multiple joints, rather than concentrating it on your ankles.
- Land Softly: Aim for a quiet landing. Imagine you’re trying not to wake someone up.
- Land on the Balls of Your Feet: This allows for better control and shock absorption. Avoid landing flat-footed or on your heels.
- Maintain Balance: Keep your body centered over your feet. Avoid letting your knees cave inwards or your ankles roll outwards.
- Look Where You’re Landing: Be aware of your surroundings and other players to avoid awkward contact.
External Support: Ankle Bracing Techniques
For players who have a history of ankle sprains or feel their ankles are particularly vulnerable, ankle bracing techniques can offer an additional layer of protection.
Types of Ankle Braces
- Ankle Taping: Athletic tape can be applied in specific patterns to provide support and limit excessive ankle motion. This is a common method used by athletes.
- High Lacing Technique: Starts at the top of the foot, wraps around the heel, and then crisscrosses up the ankle, securing the malleoli (bony bumps) on the sides.
- Figure-Eight Taping: Wraps around the heel and the front of the ankle in a figure-eight pattern.
- Ankle Sleeves: These are elastic sleeves that provide compression and mild support. They can improve blood flow and proprioception.
- Semi-Rigid Braces: These braces typically have plastic or metal supports on the sides and a strap system to provide more robust stability. They are often worn over a sock.
- Hinged Braces: These offer the highest level of support and are designed to prevent both inversion and eversion sprains.
When to Use Braces and How to Apply Them
- Preventative Use: Some players choose to wear braces as a preventative measure, especially those with a history of sprains.
- Post-Injury Support: Braces are often recommended during the rehabilitation phase after an ankle sprain to protect the healing ligaments.
- Proper Fit and Application: Ensure any brace or tape is applied correctly and doesn’t impede circulation. If you’re unsure, consult a trainer or sports medicine ankle care professional.
A Holistic Approach: Injury Prevention Strategies
Preventing ankle sprains involves more than just exercise; it’s a comprehensive strategy. These injury prevention strategies encompass nutrition, rest, and listening to your body.
Key Injury Prevention Strategies
- Consistent Training: Regular participation in strengthening, balance, and plyometric exercises is vital.
- Proper Nutrition and Hydration: A balanced diet supports muscle and bone health, and adequate hydration is essential for tissue elasticity.
- Adequate Rest and Recovery: Allow your body time to recover between practices and games to prevent fatigue, which can lead to poor mechanics and increased injury risk.
- Listen to Your Body: Don’t push through pain. If you feel a twinge or discomfort, address it. Seek professional help if needed.
- Surface Awareness: Be mindful of court conditions. Uneven or slippery surfaces can increase the risk of sprains.
- Court Awareness: Pay attention to other players on the court to avoid stepping on their feet or getting tangled up.
When to Seek Professional Help: Sports Medicine Ankle Care
While many ankle sprains can be managed at home, it’s crucial to know when to seek expert advice. Sports medicine ankle care professionals can provide accurate diagnosis, tailored rehabilitation programs, and advice on prevention.
Recognizing When to See a Doctor or Physical Therapist
- Severe Pain: If the pain is intense and prevents you from putting weight on your foot.
- Inability to Walk: If you cannot take a few steps without significant pain.
- Significant Swelling or Bruising: Large amounts of swelling or bruising can indicate a more severe injury.
- Deformity: If the ankle looks crooked or out of place.
- Persistent Instability: If your ankle feels wobbly or gives out frequently, even after initial healing.
- Recurrent Sprains: If you experience multiple ankle sprains, a professional can help identify underlying issues.
A physical therapist can guide you through specific rehabilitation exercises, including ankle strengthening exercises, balance drills, and proprioception retraining, to ensure a full recovery and reduce the risk of future injuries.
Frequently Asked Questions (FAQ)
Q1: How often should I do ankle strengthening exercises?
A1: Aim to incorporate ankle strengthening exercises into your routine at least 2-3 times per week. Consistency is key for building and maintaining strength and stability.
Q2: Can I play basketball with a mild ankle sprain?
A2: It’s generally not recommended to play with an active ankle sprain, even a mild one. Playing through pain can worsen the injury and lead to chronic instability. It’s best to rest, ice, compress, and elevate (RICE) the ankle and consult a sports medicine professional for guidance on when it’s safe to return to play.
Q3: What is the best type of ankle brace for basketball?
A3: The “best” ankle brace depends on your individual needs and history of injuries. For preventative support, a semi-rigid brace or well-applied athletic tape is often effective. If you have a history of severe sprains or instability, a hinged brace might be more appropriate. Always consult with a sports medicine professional to determine the best option for you.
Q4: How long does it take to recover from a common ankle sprain?
A4: Recovery time varies depending on the severity of the sprain. A mild sprain (Grade 1) might take 1-3 weeks to recover, while a moderate sprain (Grade 2) can take 3-6 weeks. Severe sprains (Grade 3) may require several months and potentially surgery. A structured rehabilitation program is crucial for optimal recovery.
Q5: Can I do plyometrics even if I’ve never had an ankle sprain?
A5: Yes, if you have a good foundation of strength and balance, plyometric training can be beneficial for all basketball players to improve explosiveness and injury resilience. However, always start with proper technique and gradually progress to more advanced drills. If you have any underlying concerns, consult a coach or physical therapist first.
By integrating these practices into your basketball regimen, you can significantly enhance your ankle’s resilience and enjoy the game with greater confidence and fewer worries about injury. Stay strong, play smart, and keep those ankles protected!