
Can I install a basketball hoop in the ground myself? Yes, you absolutely can install a basketball hoop in the ground yourself with the right tools and a bit of planning. This guide will walk you through every step, from choosing the right hoop to making sure it’s secure for years of play.
Setting up an in-ground basketball hoop is a rewarding DIY project that transforms your backyard into a fun zone for family and friends. Unlike portable hoops that can be moved, an in-ground hoop offers superior stability and a professional feel, making it ideal for serious players and casual fun alike. This detailed guide focuses on the complete in-ground hoop setup process, covering everything you need to know for a successful basketball hoop installation.
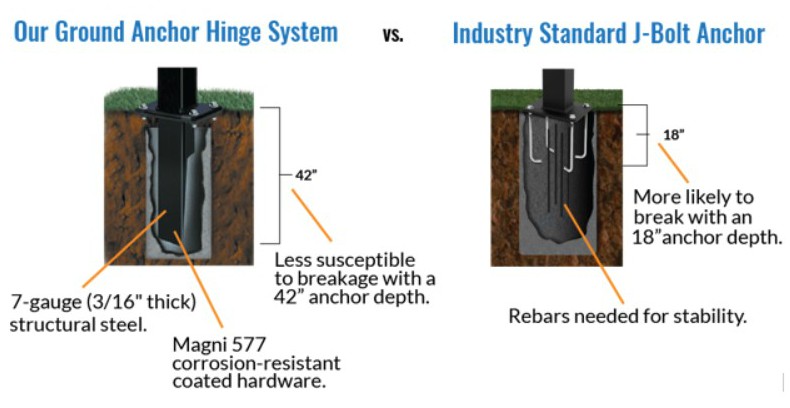
Image Source: www.breakthroughbasketball.com
Deciphering Your Hoop Choice: Portable vs. In-Ground Hoop
Before you grab a shovel, it’s important to know the difference between portable and in-ground hoops.
- Portable Hoops: These have a base filled with water or sand. They are easy to move but can be less stable, especially for aggressive play.
- In-Ground Hoops: These are permanently fixed to the ground with a concrete base. They offer the best stability and performance, mimicking professional setups.
For this guide, we’re focusing on the latter. An in-ground hoop setup provides a much more durable and enjoyable experience if you have the space and are ready for a more involved installation.
Planning Your Backyard Basketball Court
A solid plan is the first step to a great basketball hoop installation. Consider these factors:
Site Selection
- Clearance: Ensure there are no overhead obstructions like tree branches or power lines. You’ll need ample space behind and around the hoop for play. A general rule is at least 10-15 feet of clear space behind the backboard.
- Level Ground: While you’ll be digging, starting with the flattest area possible makes the job easier.
- Distance from Boundaries: Think about how close you want the hoop to be to fences, houses, or other structures. You don’t want to accidentally break windows or damage property.
- Sunlight: Consider the sun’s path during the day. You don’t want players constantly squinting into the sun.
Hoop Specifications
- Height: Standard basketball hoop height is 10 feet. Many adjustable hoops allow you to set lower heights for younger players.
- Backboard Size: Backboards come in various sizes, from 44 inches to 72 inches. Larger backboards offer a more professional feel but require more space.
- Rim Type: Look for a durable, break-away rim that can withstand dunking.
Gathering Your Tools and Materials
Having everything ready before you start digging will save you time and frustration.
Essential Tools:
- Shovel (round point and flat head)
- Post hole digger (manual or powered auger)
- Level (long and short)
- Measuring tape
- Wheelbarrow
- Buckets
- Wrench and socket set (to match your hoop hardware)
- Concrete mixing tools (mixer, hoe, or shovel)
- Water source
- Safety glasses
- Work gloves
- Stakes and string (for marking)
- Chalk or spray paint
Necessary Materials:
- Your chosen in-ground basketball hoop kit (includes pole, backboard, rim, and hardware)
- Concrete (consider a good basketball hoop cement mix for optimal durability)
- Gravel (for drainage at the bottom of the hole)
- Water (for mixing concrete and for your use)
Pro Tip: Many manufacturers recommend specific concrete quantities for their hoops. Always check your hoop’s manual for recommended concrete mix ratios and quantities.
Step-by-Step Guide to In-Ground Hoop Setup
This is where the real work begins! Follow these steps carefully for a successful DIY basketball hoop post installation.
Step 1: Mark Your Hoop Location
- Using your measuring tape, stakes, and string, mark the exact center where your basketball hoop pole will go.
- Ensure this spot allows for adequate clearance around the hoop for play.
- Double-check your measurements against the desired backboard overhang and play area.
Step 2: Digging the Basketball Hoop Pole Hole
This is arguably the most labor-intensive part of how to anchor a basketball hoop.
- Hole Diameter: The diameter of the hole should be at least three times the diameter of your basketball hoop pole. Most poles are 3-4 inches in diameter, so aim for a 12-16 inch diameter hole.
- Hole Depth: This is crucial for stability. The general rule is to bury 1/4 to 1/3 of the total pole length. For a 10-foot hoop, the pole might be 12-15 feet long. You’ll want to bury at least 3-4 feet of it. Consult your hoop’s manual for specific depth recommendations. Many in-ground hoop systems also have a specific anchor kit that determines the hole size and depth.
- Using a Post Hole Digger:
- Start by digging a pilot hole in the center of your marked area.
- Use the post hole digger to gradually widen and deepen the hole. Work in sections, rotating the digger to create clean walls.
- Periodically check the depth with your measuring tape.
- Using a Powered Auger: If you have access to a powered auger, this will significantly speed up the digging process.
- Ensure you have proper safety training for operating an auger.
- Carefully guide the auger into the ground, letting it do the work.
- Be aware of underground utilities before digging. Call 811 (in the US) to have underground lines marked.
- Dealing with Rocks and Roots: You may encounter rocks or roots. Use your shovel to break up or remove them. If you hit a large rock that you can’t remove, you may need to slightly adjust the hole’s position or widen it around the obstruction.
- Drainage: Once you’ve reached the desired depth, add a layer of 4-6 inches of gravel at the bottom of the hole. This helps with drainage and prevents the concrete from cracking due to ground movement.
Step 3: Assembling the Hoop and Pole (Partial)
Before you set the pole in the ground, it’s often easier to attach the backboard and rim to the pole.
- Lay the pole on a flat surface.
- Follow your hoop’s manufacturer instructions to attach the backboard and rim assembly to the top of the pole.
- Ensure all bolts and hardware are tightened securely. Don’t overtighten, as this can strip threads.
Step 4: Positioning the Pole and Backboard
This is a critical step for ensuring your hoop is level and properly aligned.
- The Anchor Kit: Most in-ground hoops use an anchor kit. This is a metal plate with U-bolts that attach to the pole. The U-bolts will be cemented into the ground.
- Place the anchor kit onto the pole according to the manufacturer’s instructions.
- Slide the anchor kit down the pole so that the mounting plate sits flush with the ground surface once the pole is in place.
- Setting the Pole in the Hole:
- Carefully lift the pole (you might need a helper for this) and place it into the dug hole.
- Align the pole so the backboard is facing the desired direction.
- Leveling the Pole:
- Use your level to ensure the pole is perfectly vertical. Place the level against the pole on two adjacent sides.
- You may need to prop up one side of the pole with scrap wood or bricks to get it perfectly level.
- Use your stakes and string to confirm the pole is straight from multiple angles.
- Securing the Anchor Plate:
- Once the pole is plumb and in its final position, tighten the U-bolts around the pole to secure it to the anchor kit.
- Make sure the anchor kit’s mounting plate is resting on the gravel at the bottom of the hole.
Step 5: Preparing and Pouring the Concrete
This is where you create your concrete basketball hoop base. The right basketball hoop cement mix and proper pouring are essential for a strong foundation.
- Mixing the Concrete:
- You’ll need to mix your concrete according to the manufacturer’s instructions. This usually involves adding water to a dry mix in a wheelbarrow or concrete mixer.
- Aim for a thick but pourable consistency. Too much water weakens the concrete.
- A common concrete basketball hoop cement mix ratio is about 4-6 quarts of water per 80-pound bag of concrete. However, always follow the specific product instructions.
- Pouring the Concrete:
- Start pouring the concrete into the hole around the pole and the anchor kit.
- Work in layers. Pour about a foot of concrete, then use a shovel or a piece of wood to tamp it down firmly. This removes air pockets and ensures the concrete fills all voids.
- Continue pouring and tamping until the hole is filled.
- Crucially: As you pour, constantly check the pole’s verticality with your level. Make adjustments as needed to keep it perfectly plumb. The concrete will start to set, making adjustments harder later.
- Finishing the Surface:
- Once the hole is filled, use a flat shovel or a trowel to create a slightly sloped surface around the pole. This helps water run away from the base, preventing erosion.
- The concrete should be at ground level or slightly above, depending on your preference.
Step 6: Curing the Concrete
This is a vital step for the strength of your foundation. Don’t rush it!
- Keep it Moist: Concrete cures through a chemical reaction, not by drying. To ensure it cures properly, you need to keep it moist for at least 3-7 days.
- You can cover the concrete with plastic sheeting to trap moisture.
- Alternatively, you can gently spray the concrete with water a few times a day, especially in hot or dry weather.
- Avoid Stress: Do not put any stress on the pole during the curing process. No leaning, no hanging on the rim.
- Timeframe: While you can typically attach the backboard and rim after 24-48 hours (if you didn’t do it in Step 3), it takes about 7 days for the concrete to gain significant strength, and up to 28 days to reach full hardness. However, for most DIY installations, waiting 3-5 days before playing is acceptable, provided the weather has been favorable for curing.
Step 7: Final Adjustments and Play
Once the concrete has had sufficient time to cure (at least 2-3 days is often enough to start playing, but a week is better):
- Remove Propping: If you used any props to hold the pole level, remove them.
- Final Check: Give the pole a gentle shake to ensure it’s solid.
- Adjust Hoop Height (if applicable): If your hoop is adjustable, now is the time to set it to your desired height.
- Let the Games Begin! Your in-ground hoop installation is complete.
Important Considerations for Basketball Hoop Installation
When performing your in-ground hoop setup, keep these points in mind.
Safety First!
- Call Before You Dig: Always call 811 in the US to have underground utility lines marked. Hitting a gas line or power cable can be catastrophic.
- Two-Person Job: Digging and setting the pole can be heavy. It’s much safer and easier with a helper.
- Wear Protective Gear: Always wear safety glasses, gloves, and sturdy footwear.
Weather Conditions
- Avoid Extreme Heat/Cold: Pouring concrete in extreme temperatures can affect its curing. Ideal temperatures are between 50°F and 80°F.
- Rain: Don’t pour concrete if rain is expected within 24 hours, as it can wash away the cement paste and weaken the mix.
Pole Types and Anchor Systems
There are a few common ways in-ground poles are anchored:
- Direct Burial: The pole is placed directly into the concrete. This is less common for modern hoops.
- Anchor Kit System: The most prevalent method. The pole attaches to an anchor kit, which is a metal plate with U-bolts. This kit is cemented into the ground, and the pole bolts onto it. This allows for easier leveling and removal if needed.
- Sleeve System: A metal sleeve is cemented into the ground, and the pole slides into the sleeve. This is also common and allows for easy height adjustment or pole replacement.
Always refer to your specific hoop’s manual for its recommended anchor system.
Pro vs. DIY Basketball Hoop Installation
While a DIY installation is achievable, there are times when hiring a professional basketball hoop installation service might be better.
When to Consider Professional Installation:
- Lack of Time or Physical Ability: If you don’t have the time or physical strength for the digging and concrete work, a professional can do it quickly and efficiently.
- Difficult Terrain: If your yard has significant slopes, rocks, or is prone to high water tables, professionals have the equipment and expertise to handle these challenges.
- Complex Hoops: For very large or high-end hoops (like those used for commercial or institutional use), professional installation ensures maximum safety and compliance with regulations.
- Peace of Mind: Knowing the job is done correctly by experienced professionals can be worth the cost.
When DIY is a Great Option:
- Budget Conscious: You’ll save a significant amount on labor costs.
- Enjoying the Project: If you like hands-on work and the satisfaction of building something yourself.
- Standard Backyard: For most residential backyards with reasonably level ground, a DIY installation is very manageable.
Frequently Asked Questions (FAQ)
How deep should the hole be for an in-ground basketball hoop?
The depth of the hole depends on the pole length and hoop manufacturer’s recommendations. Generally, you should bury 1/4 to 1/3 of the pole’s total length. For a 10-foot hoop, this often means a hole 3-4 feet deep. Always check your specific hoop’s manual for exact requirements.
How much concrete do I need for a basketball hoop?
The amount of concrete varies based on the hole’s diameter and depth. A common recommendation for a 12-inch diameter, 3-foot deep hole is about 5-7 bags (80lb bags) of concrete mix. It’s always best to consult your hoop’s manual or use a concrete calculator for a precise estimate.
Can I use quick-setting concrete for a basketball hoop?
While quick-setting concrete hardens fast, it’s generally not recommended for basketball hoops. Standard concrete provides a stronger, more durable foundation that cures over a longer period, giving you time to make adjustments and ensuring better long-term stability.
What is the best way to ensure the basketball hoop pole is perfectly vertical?
Use a long spirit level. Place it against the pole on two adjacent sides. You may need to use temporary braces or wedges to hold the pole in place while the concrete cures. Keep checking the level throughout the pouring and initial setting of the concrete.
How long should I wait before playing on the new basketball hoop?
It’s best to wait at least 2-3 days for the concrete to set sufficiently before putting any significant stress on the pole. For optimal strength and durability, allow at least 7 days for the concrete to cure properly before aggressive play.
What if I make a mistake during installation?
If you realize the pole isn’t plumb while pouring the concrete, you can still make adjustments. Once the concrete starts to set, it becomes very difficult to move. If you discover a significant error after the concrete has cured, you may need to dig up the base and start over, or consult a professional for repair options.
How do I prepare the ground around the hoop?
After the concrete has cured, you can grade the area around the base so it slopes slightly away from the pole. This prevents water from pooling and potentially weakening the concrete over time. You can then lay down grass seed, gravel, or asphalt to create your backyard basketball court surface.
Installing an in-ground basketball hoop is a project that requires careful planning and execution, but the result is a fantastic addition to your home. By following these steps, you can confidently complete your DIY basketball hoop post installation and enjoy countless hours of basketball fun.