
Can you install an in-ground basketball hoop yourself? Yes, with the right tools and a little effort, you can successfully install an in-ground basketball hoop yourself. This guide will walk you through the entire process, from choosing the right location to the final tightening of the bolts. Installing an in-ground basketball hoop is a rewarding project that can bring years of fun and exercise to your home. It’s a significant upgrade from portable hoops and offers a more stable and professional feel. This in-depth guide will cover everything you need to know about in ground basketball hoop installation.
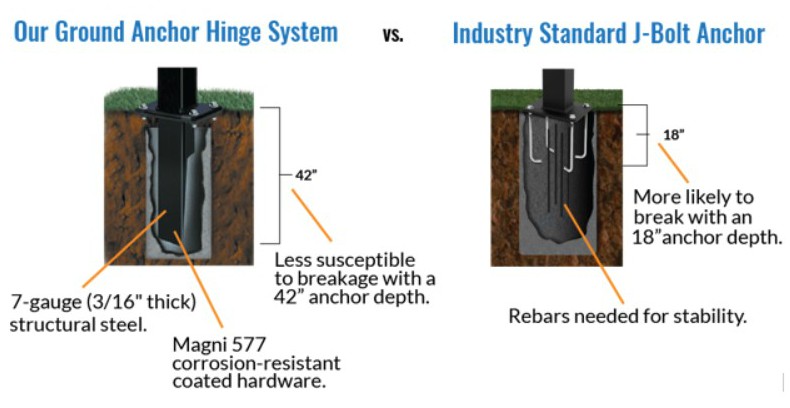
Image Source: www.breakthroughbasketball.com
Preparing for Your Backyard Basketball Hoop Installation
Before you even think about digging, thorough preparation is key to a smooth and successful backyard basketball hoop installation. This involves selecting the ideal spot, gathering all necessary tools and materials, and understanding the specific requirements of your chosen hoop system.
Choosing the Perfect Spot
The location of your hoop is crucial. Consider these factors:
- Safety: Ensure there are no overhead obstructions like power lines or tree branches. Also, leave ample space behind the backboard for errant shots and player movement. A general rule of thumb is at least 10-15 feet of clear space behind the hoop.
- Playability: Think about how you’ll use the hoop. If it’s for serious play, a level surface is essential. Avoid areas with significant slopes. Consider the direction of the sun to minimize glare during gameplay.
- Aesthetics and Neighbors: While you want a great playing area, also be mindful of your neighbors. Avoid placing the hoop so that it constantly directs balls towards their property or creates excessive noise that might be disruptive.
- Drainage: Choose a spot that doesn’t collect water. A perpetually wet area can lead to slippery conditions and potential damage to the pole and concrete.
Essential Tools and Materials
Having the right tools on hand will make the process much easier. Here’s a comprehensive list:
Tools:
- Shovel (round point and flat head)
- Post hole digger (manual or powered auger)
- Tape measure
- Level (4-foot level is ideal)
- Wheelbarrow
- Concrete mixing tub or wheelbarrow
- Stirring tool for concrete
- Wrench set (adjustable and socket)
- Safety glasses
- Work gloves
- Safety cones or markers
- String and stakes
- Caulking gun (if using a sealant)
- Drill (for anchor kit bolts)
- Optional: Small trowel for smoothing concrete
Materials:
- Your chosen in-ground basketball hoop system (backboard, rim, pole, net)
- Inground basketball hoop anchor kit (often included with the hoop, but confirm)
- Concrete mix (check your hoop’s manual for recommended type and quantity)
- Water for mixing concrete
- Gravel (for drainage at the bottom of the hole)
- Sand (optional, for leveling the base)
- Anchor bolts (usually part of the anchor kit)
- Support braces or struts (if included with your system)
- Weatherproof sealant or paint (for exposed metal parts)
Deciphering Hoop System Requirements
Each in-ground basketball hoop system has slightly different installation needs. Always refer to the manufacturer’s manual for your specific model. Pay close attention to:
- Pole diameter and length: This will influence the size of the hole you need to dig.
- Anchor kit specifications: The manual will detail how to assemble and position the anchor system within the concrete.
- Backboard mounting requirements: This includes bolt patterns and any necessary adapters.
- Recommended concrete volume: This is crucial for a stable installation.
Step-by-Step: Setting Up Your In Ground Basketball Hoop
This section breaks down the entire process of setting up your in ground basketball hoop, from digging the hole to attaching the backboard.
Step 1: Measuring and Marking the Hoop Location
Once you’ve chosen your spot, it’s time to mark it precisely.
- Determine Hoop Position: Decide where you want the center of the pole to be. This is usually dictated by the desired playing area and any regulations for court dimensions.
- Mark the Pole Center: Use a stake or a can of spray paint to clearly mark the exact center point where the hoop pole will be installed.
- Check Clearance: Double-check that you have adequate clearance behind the hoop, around the sides, and overhead. Use your tape measure and walk the area.
Step 2: Digging the Hole for the Basketball Hoop
Digging the hole is perhaps the most physically demanding part of the in ground basketball hoop installation. Accuracy here ensures stability later on.
How Deep and Wide Should the Hole Be?
- Depth: Most in-ground basketball hoop systems require a hole that is 3 to 4 feet deep. Always consult your manual, as the depth is critical for stability, especially for taller hoops or those with heavier backboards. A deeper hole provides a stronger foundation against wind and player impact.
- Width: The diameter of the hole is typically 18 to 24 inches. Again, your manual will specify the exact diameter needed. A wider hole allows for easier placement of the anchor kit and ensures enough concrete surrounds the pole.
The Digging Process:
-
Using a Manual Digger:
- Start digging at your marked center point.
- As you dig, periodically measure the depth and width of the hole.
- Use the flat-head shovel to scrape the sides and bottom, ensuring they are as vertical as possible.
- If your soil is loose, you might need to widen the hole slightly as you go down to prevent cave-ins.
-
Using a Powered Auger:
- If using a powered auger (rented or owned), ensure you have a helper to control it safely.
- Start digging at the marked center.
- Drive the auger down, but be cautious not to over-dig or hit underground utilities.
- Periodically lift the auger out of the hole to clear debris.
- Measure the depth and width as you go.
-
Adding Gravel for Drainage:
- Once the hole is dug to the correct depth, add a 4-6 inch layer of gravel at the bottom. This is vital for drainage and prevents water from pooling around the base of the pole.
- Compact the gravel using the end of the shovel or a tamper.
Step 3: Assembling and Positioning the Anchor Kit
The inground basketball hoop anchor kit is the foundation of your installation. It’s what secures the pole to the concrete.
- Assemble the Anchor Plate: Lay out all the components of your anchor kit. This typically includes a metal plate with several pre-drilled holes and various anchor bolts. Assemble the plate according to the manufacturer’s instructions.
- Position the Anchor Kit:
- Carefully place the assembled anchor plate into the center of the hole, resting it on the compacted gravel.
- Ensure the anchor bolts (which will extend upwards to connect to the pole) are pointing straight up.
- Use a level to make sure the anchor plate is perfectly horizontal. This is critical for ensuring your basketball hoop pole is plumb (perfectly vertical). You might need to add or remove gravel under the plate to achieve this.
- The manufacturer’s manual will often have a jig or template to help you position the anchor bolts at the correct spacing. Ensure the bolts are equidistant from the center and aligned correctly.
- Secure the Anchor Kit (Temporary): Once the anchor plate is level and the bolts are in place, you need to secure it temporarily so it doesn’t shift when you pour the concrete. You can do this by:
- Using the Hoop Pole: If your system allows, temporarily place the main hoop pole onto the anchor bolts. This will hold everything in place.
- Bracing: Use scrap wood and stakes to create a temporary brace system around the top of the hole, holding the anchor plate and bolts firmly in position. Ensure these braces don’t interfere with the concrete pour.
Step 4: How to Pour Concrete for Your Basketball Hoop
Pouring concrete correctly is vital for a strong and lasting installation. This step is crucial for the basketball hoop concrete base.
Concrete Mix and Quantity:
- Type of Concrete: Use a high-strength concrete mix (e.g., 3000 PSI or higher). Bagged concrete mixes are readily available and convenient.
- Quantity: The amount of concrete needed varies significantly based on the hole size and depth. Your hoop manual will provide a specific recommendation. It’s better to have a little extra than not enough. A typical 3-4 foot deep hole with an 18-24 inch diameter can require 8-15 bags of concrete (50lb bags).
The Concrete Pouring Process:
- Mixing the Concrete:
- In a mixing tub or wheelbarrow, add the dry concrete mix.
- Gradually add water, following the instructions on the concrete bag.
- Mix thoroughly with a stirring tool until you achieve a consistent, workable consistency. It should be like thick oatmeal, not too watery and not too crumbly.
- Filling the Hole:
- Begin pouring the mixed concrete into the hole, around the anchor bolts.
- Work in layers, pouring about a foot of concrete at a time.
- After each layer, use a shovel or a piece of rebar to poke into the concrete. This removes air pockets (voids) and ensures the concrete fills every part of the hole and surrounds the anchor bolts completely. This is also called “tamping” or “rodding.”
- Continue this process until the concrete reaches the top of the hole.
- Leveling and Finishing:
- Once the concrete is poured, use a flat shovel or a piece of lumber to strike off any excess concrete, making the surface level with the ground or slightly crowned to allow water to run off.
- Use a trowel to smooth the surface. If you used a jig or pole to hold the anchor kit, carefully remove it now if possible, or ensure it’s not embedded too deeply and can be detached later. If you braced the anchor kit, ensure the concrete is poured around it without trapping the braces.
- The anchor bolts should still be perfectly vertical and accessible.
Curing Time:
- Allow the concrete to cure for at least 48-72 hours before proceeding with any further installation steps. For maximum strength, especially in demanding climates, allow up to 7 days of curing. Keep the concrete moist during the first few days by covering it with plastic sheeting or misting it with water periodically. This prevents it from drying out too quickly, which can weaken it.
Completing the In Ground Hoop Pole Installation
With the concrete cured and your foundation solid, it’s time to connect the pole.
Step 5: Attaching the Pole to the Anchor Kit
This is where your in ground hoop pole installation really starts to take shape.
- Lift the Pole: You will likely need at least one helper for this step, as the poles can be heavy. Carefully lift the main pole of your basketball hoop system.
- Align and Secure: Position the pole over the anchor bolts, aligning the bolt holes on the pole’s base plate with the anchor bolts in the concrete.
- Tighten the Nuts: Place the washers and nuts onto the anchor bolts and hand-tighten them.
- Level the Pole: Use your 4-foot level on two adjacent sides of the pole. Adjust the nuts on the anchor bolts until the pole is perfectly plumb (vertical). Ensure the pole base is seated firmly on the anchor plate.
- Final Tightening: Once the pole is perfectly plumb, tighten all the nuts securely with your wrench. Tighten them in an alternating pattern (like tightening lug nuts on a car tire) to ensure even pressure. Do not overtighten, as this can strip the threads.
Step 6: Installing the Backboard and Rim
This is the exciting part where your basketball hoop starts to look complete!
- Assemble Backboard Components: If your backboard comes in multiple pieces or requires attaching mounting brackets, do this now according to the manual.
- Mounting the Backboard:
- This often requires multiple people. Lift the backboard and align its mounting holes with the corresponding attachment points on the pole.
- Insert the bolts and washers provided with your kit and hand-tighten them.
- Attaching the Rim:
- Align the rim with the pre-drilled holes on the backboard.
- Insert the rim bolts and washers.
- Tighten the rim bolts securely using your wrench. Ensure the rim is level.
- Adjusting Backboard Height (If Applicable): Many in-ground hoops allow for height adjustment. Follow your manual’s instructions to raise or lower the backboard to your desired height (the standard is 10 feet). You may need to loosen certain bolts, slide the pole sections or adjust a mechanism, and then re-tighten everything.
- Attaching the Net: Hook the net onto the rim loops.
Step 7: Final Checks and Touches
Before you start dunking, perform these final checks.
- Check All Bolts: Go over every bolt and nut you’ve tightened and ensure they are snug.
- Test Stability: Gently push and pull on the hoop structure to check for any wobble or looseness. If you detect any, re-check the tightness of the anchor bolts.
- Apply Sealant (Optional): If there are any exposed metal parts that might rust, consider applying a weatherproof sealant or paint.
- Clean Up: Remove all tools, excess materials, and debris from the installation area.
FAQ: Your Questions Answered About In Ground Basketball Hoop Installation
Here are some common questions people have when installing an in-ground basketball hoop.
Q1: What is the best type of concrete for an in-ground basketball hoop?
A1: A high-strength concrete mix, typically rated at 3000 PSI or higher, is recommended. This ensures a durable and stable foundation for your basketball hoop concrete base.
Q2: Can I install an in-ground basketball hoop myself without help?
A2: While some smaller, lighter systems might be manageable with one person, it is highly recommended to have at least one helper, especially when lifting the pole and attaching the backboard. Safety and ease of installation are greatly improved with assistance.
Q3: How long does concrete need to cure before I can use the hoop?
A3: While you can often proceed with attaching the pole after 48-72 hours, it’s best to allow the concrete to cure for at least 7 days for maximum strength, especially if you plan on aggressive play or dunking. Keep the concrete moist during the curing process.
Q4: What if I hit something while digging the hole for the basketball hoop?
A4: Immediately stop digging and identify what you’ve hit. It could be a utility line (gas, water, electric, cable). Contact your local utility locating service (e.g., 811 in the US) before you dig to have underground lines marked. If you are unsure, do not proceed and consult a professional.
Q5: My in ground basketball hoop anchor kit has extra parts. What do I do?
A5: Always refer to your specific hoop’s instruction manual. Different systems have varying anchor kits. If parts are not detailed in the manual and you are unsure, contact the manufacturer’s customer support for clarification before proceeding.
Q6: Is it okay if the concrete surface is not perfectly smooth after pouring?
A6: A slightly imperfect surface is usually fine. The most critical aspect is that the anchor bolts remain perfectly level and the concrete is solid. Minor surface imperfections can be smoothed with a trowel or covered with landscaping if desired.
Q7: My pole isn’t perfectly vertical after tightening the bolts. What should I do?
A7: You may need to loosen the nuts on the anchor bolts, adjust the pole using the level, and then re-tighten them. Sometimes, minor adjustments can be made by slightly loosening and repositioning the pole. If it’s significantly off, you might need to dig up the concrete and start again, ensuring the anchor kit is perfectly level during the pour.
Q8: What is the best way to ensure my in ground hoop pole installation is stable?
A8: The stability comes from a properly dug hole, a well-compacted gravel base, a perfectly level anchor kit, sufficient concrete volume, and securely tightened anchor bolts. Following each step diligently will ensure a stable installation.
Q9: Can I use a different size hole than recommended by the manufacturer for my in ground basketball hoop?
A9: It is strongly advised to stick to the manufacturer’s recommended hole size. Digging too shallow or too narrow can result in an unstable pole. Digging too wide may mean you don’t have enough concrete to fill the space properly, or you use excessive amounts of concrete.
Q10: How do I maintain my in-ground basketball hoop?
A10: Regularly check the tightness of all bolts and nuts. Clean the backboard and pole periodically. Inspect the net for wear and tear. If you live in an area with harsh weather, consider covering the hoop during extreme conditions if possible, or applying protective coatings to metal parts.
By following these detailed basketball hoop installation steps, you can confidently tackle the project and enjoy your new in-ground basketball hoop for years to come. Remember to prioritize safety, read your manual thoroughly, and don’t rush the process, especially the concrete curing time.