
Can I build a basketball court in my backyard? Yes, you absolutely can build a basketball court in your backyard. This guide will walk you through the entire process, from planning to the final bounce.
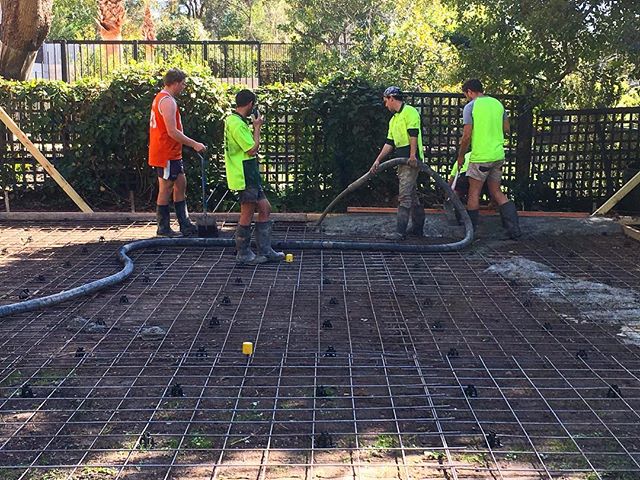
Image Source: static.msfsports.com.au
Getting Started: Your Dream Court Awaits
Building your own DIY basketball court is a rewarding project. It offers a dedicated space for fun, exercise, and honing your skills. Whether you dream of a full-sized regulation court or a smaller half-court for casual play, this step-by-step guide will cover everything you need to know for outdoor basketball court construction. We’ll delve into basketball court dimensions, choose the right basketball court surface, select the best basketball court materials, prepare the basketball court foundation, and handle the crucial basketball hoop installation.
Step 1: Planning Your Basketball Court
Before you grab a shovel, careful planning is key. This initial phase sets the stage for a successful build.
Deciding on Court Size and Location
The first decision is where your court will go and how big it will be.
Basketball Court Dimensions
Official NBA basketball court dimensions are 94 feet long by 50 feet wide. For a full-sized NCAA court, it’s 94 feet by 50 feet as well. FIBA (international) courts are slightly smaller at 91.9 feet by 49.2 feet.
However, most backyard courts are smaller. A common size for a half-court is 50 feet long by 30 feet wide. You can adjust these based on your available space and intended use. Even a smaller 20×20 foot area can be enough for practice.
Consider these factors when choosing a location:
- Flatness: A relatively flat area is crucial. Significant slopes will require more excavation and grading, increasing costs and complexity.
- Sunlight: Think about sun exposure. Too much sun can make playing uncomfortable. Consider how the sun moves throughout the day and where shadows might fall.
- Drainage: Water needs to drain away from the court. Avoid low-lying areas that tend to collect water.
- Obstacles: Check for trees, bushes, fences, or utility lines that might interfere with the court or the playing area around it.
- Access: Ensure easy access to the court and a clear path for bringing in materials.
Basketball Court Layout
Once you have a location, you need to plan the basketball court layout. This involves marking the boundaries, the three-point line, the free-throw lane (the “key” or “paint”), and the center circle.
- Boundaries: These are the outer lines of your court.
- Free-Throw Line: This is 15 feet from the face of the backboard.
- Three-Point Line: The NBA three-point line is 23 feet 9 inches from the center of the hoop at the top of the arc and 22 feet in the corners. College and FIBA lines are slightly different.
- Center Circle: This is used for jump balls.
You can find detailed diagrams online for precise measurements and markings for different league standards.
Budgeting for Your Project
Building a backyard basketball court requires an investment. Your budget will influence your choices for basketball court materials and basketball court surface.
Consider costs for:
- Site Preparation: Excavation, grading, gravel, concrete/asphalt.
- Surface Material: Acrylic coatings, rubber granules, wood.
- Hoop System: Backboard, rim, pole, hardware.
- Markings: Paint, stencils.
- Labor (if not DIY): Professional installation costs.
- Drainage: If needed.
- Fencing/Lighting: Optional extras.
Get quotes for materials and any professional services you might need.
Step 2: Preparing the Foundation
The basketball court foundation is the most critical part of the construction. A solid base ensures durability and a good playing surface for basketball.
Site Excavation and Grading
- Clear the Area: Remove any grass, vegetation, rocks, and debris from the chosen site. You’ll want to excavate at least 6 inches deep, potentially more depending on your chosen surface and climate.
- Grading: The area needs to be graded so it slopes slightly (about 1% or 1/8 inch per foot) away from any buildings or structures. This ensures proper drainage and prevents water from pooling on the court. Use stakes and string lines to guide your grading for a consistent slope.
Base Layer Installation
A strong base is essential for supporting the basketball court surface.
Gravel Base
- Material: Use crushed stone or gravel (typically 3/4-inch to 1.5-inch aggregate).
- Depth: Install a layer of gravel at least 4 inches deep. For heavier-duty courts or areas with significant frost heave, 6 inches or more might be recommended.
- Compaction: Compact the gravel thoroughly using a plate compactor. This removes air pockets and creates a stable, dense base. Repeat compaction after adding each 2-inch layer of gravel.
Edge Containment
To keep the base material in place and provide clean edges, you’ll need edge containment.
- Materials: This can be done using treated lumber (4×4 or 4×6), concrete curbing, or specialized plastic edging.
- Installation: Secure the edging firmly to the ground, ensuring it’s level and matches your desired court dimensions. This will hold the gravel and the final basketball court surface.
Step 3: Choosing and Installing the Basketball Court Surface
The basketball court surface significantly impacts playability, safety, and aesthetics. There are several popular options for building a backyard basketball court.
Common Basketball Court Surfaces
Here’s a look at the most common basketball court materials:
1. Concrete
- Description: A durable and popular choice. Properly installed concrete provides a hard, smooth surface ideal for basketball.
- Pros: Very durable, long-lasting, relatively low maintenance once installed, can be colored and textured.
- Cons: Hard on joints, can crack over time if not installed correctly or if the base is poor, can be slippery when wet if not treated, requires professional installation for best results.
- Installation: After the gravel base and edge containment are in place, concrete is poured and smoothed. Expansion joints are crucial to prevent cracking due to temperature changes. The concrete should be at least 4 inches thick and reinforced with rebar or wire mesh.
2. Asphalt
- Description: Another sturdy option, asphalt is a common choice for driveways and courts.
- Pros: Good shock absorption compared to concrete, durable, can be sealed and painted.
- Cons: Requires professional installation, can soften in extreme heat, may need resealing every few years.
- Installation: Similar to concrete, asphalt requires a well-compacted gravel base. It’s laid down in layers and compacted. It also needs to cure properly before being used.
3. Acrylic Coating Systems
- Description: These are multi-layer systems applied over a concrete or asphalt base. They provide color, cushioning, and texture.
- Pros: Excellent color options, can add cushioning layers for player comfort, good traction, smooth finish, customizable looks.
- Cons: Requires a pre-existing concrete or asphalt surface, can be more expensive, needs recoating periodically.
- Installation: Applied in multiple layers using rollers and squeegees. The number of layers and the inclusion of cushioning granules will affect the final feel and cost.
4. Modular Sports Tiles
- Description: These are interlocking plastic tiles that snap together to create a playing surface for basketball. They are often made from high-impact polypropylene.
- Pros: Easy to install (great for DIY basketball court projects), excellent drainage (water flows through the gaps), can be taken apart and moved, good shock absorption, various colors available.
- Cons: Can be expensive, may shift over time if not installed on a perfectly level and stable base, can be noisy, some cheaper tiles might be brittle in extreme cold.
- Installation: Requires a very flat and stable base (like compacted gravel or existing concrete/asphalt). The tiles are simply clicked together.
5. Natural Grass or Clay
- Description: While less common for serious basketball, some casual courts use these.
- Pros: Natural feel, relatively inexpensive if you already have a lawn.
- Cons: Not suitable for competitive play, requires constant maintenance (mowing, watering, leveling), poor ball bounce, can become muddy and unplayable.
Choosing the Right Surface for Your Needs
- For serious players and durability: Concrete or asphalt with acrylic coatings are excellent.
- For DIYers and good drainage: Modular sports tiles are a strong contender.
- For budget-conscious casual play: A well-prepared asphalt or concrete base, potentially without extensive coatings, can suffice.
Step 4: Installing the Hoop System
The basketball hoop installation is the next exciting step. This involves setting the pole and attaching the backboard and rim.
Types of Basketball Hoop Systems
- In-Ground Systems: These are the most common and offer the most stability. The pole is concreted directly into the ground.
- Pros: Very stable, permanent, professional feel.
- Cons: Permanent installation, requires significant digging and concrete.
- Adjustable Pole Systems: Most in-ground systems offer adjustable heights, allowing you to lower the hoop for younger players or for dunking practice.
- Wall-Mounted Systems: These are attached to a wall, typically a garage or house.
- Pros: Space-saving, good for smaller yards.
- Cons: Requires a sturdy wall, can put stress on the wall, limited placement options.
- Portable Systems: These have a base filled with water or sand and wheels to move them around.
- Pros: Mobile, easy to set up.
- Cons: Less stable than in-ground systems, can be a tripping hazard, not ideal for heavy use or aggressive play.
Basketball Hoop Installation – In-Ground System Example
For a sturdy in-ground system, follow these general steps:
1. Pole Placement and Hole Digging
- Mark Location: Determine the exact spot for the pole. This is usually set back from the baseline, and its placement will influence your basketball court layout. Ensure it’s a safe distance from the court’s edge.
- Dig the Hole: Dig a hole that is typically 2 to 4 feet deep and 18 to 24 inches in diameter. The depth depends on your climate (deeper in frost zones) and the height of your hoop. Check the manufacturer’s recommendations.
- Gravel in Hole: Add about 6 inches of gravel to the bottom of the hole for drainage.
2. Setting the Pole
- Position the Pole: Place the pole in the hole. Many systems come with a J-bolt anchor system that needs to be set in concrete. Others have a direct-bury option.
- Leveling: Use a level to ensure the pole is perfectly plumb (vertical). Brace it securely with temporary supports (e.g., 2x4s and stakes) to hold it in place while the concrete cures.
- Pour Concrete: Mix and pour concrete into the hole around the pole. Follow the manufacturer’s instructions for the amount of concrete needed. Slope the top of the concrete away from the pole to allow water to run off.
- Curing: Allow the concrete to cure completely, typically 48-72 hours, before attaching the backboard and rim or putting any stress on the pole.
3. Attaching the Backboard and Rim
- Assemble Components: Assemble the backboard, rim, and any support braces according to the manufacturer’s instructions.
- Mounting: Carefully lift the backboard assembly and attach it to the pole. Ensure it’s level and at the correct height (10 feet for regulation).
- Tighten Hardware: Securely tighten all bolts and hardware. Double-check everything for stability.
Step 5: Marking Your Court
Once the surface is ready and the hoop is installed, it’s time for the basketball court layout and markings.
Marking Materials
- Line Marking Paint: Specialized acrylic paints designed for outdoor courts are ideal. They are durable and come in various colors.
- Stencils: You can purchase stencils for the free-throw line, three-point arc, and other court markings for precise application.
Marking Process
- Measure and Mark: Use a long measuring tape and chalk to lightly mark all lines according to your planned basketball court dimensions. Double-check all measurements.
- Apply Paint: Use a paint roller with an extension pole for straight lines. For curves like the three-point line, use a flexible ruler or a string anchored at the center of the hoop.
- Multiple Coats: Apply thin, even coats. Allow each coat to dry completely before applying the next. Two coats are usually sufficient for good coverage and durability.
- Center Circle and Key: Mark the center circle and the free-throw lane with the appropriate stencils.
Optional Additions
- Acrylic Coatings: If you have a concrete or asphalt court, now is the time to apply acrylic coatings for color, grip, and UV protection.
- Cushioning Layers: Some acrylic systems include rubber granules to add cushioning.
- Fencing: If your court is close to a boundary or you want to keep balls contained, consider adding low fencing around the perimeter.
- Lighting: For evening play, consider installing floodlights.
Step 6: Final Touches and Enjoyment
Your DIY basketball court is almost ready!
Safety Check
- Surface: Ensure there are no loose tiles, cracks, or trip hazards.
- Hoop: Check that the pole is stable and all hardware is tight.
- Surroundings: Make sure the area around the court is clear of any hazards.
First Bounce!
Now is the time to grab your basketball and break in your new court. Enjoy the fruits of your labor!
Frequently Asked Questions (FAQ)
Q1: How much does it cost to build a backyard basketball court?
A1: The cost can vary significantly, from $2,000 to $20,000 or more. A simple asphalt or concrete pad with a hoop might be on the lower end, while a professionally installed, full-sized court with premium materials and coatings will be at the higher end. DIY projects can save on labor costs.
Q2: Can I build a basketball court on a sloped yard?
A2: It’s possible, but it adds significant complexity and cost. You’ll need to excavate and grade the area to create a level surface, which can involve retaining walls or extensive earthmoving. It’s generally easier to find a naturally flatter spot in your yard.
Q3: What is the best basketball court surface for a backyard?
A3: The “best” depends on your priorities. Concrete and asphalt are durable and common. Modular sports tiles offer excellent drainage and ease of DIY installation. Acrylic coatings over concrete or asphalt provide a premium look and feel with added cushioning.
Q4: How long does a basketball court last?
A4: A well-constructed concrete or asphalt court can last for 20-30 years or even longer with proper maintenance. Acrylic coatings may need recoating every 5-10 years, and modular tiles can last 10-15 years depending on quality and use.
Q5: Do I need permits to build a basketball court?
A5: It’s essential to check with your local municipality or homeowner’s association (HOA). Depending on the size, depth, and permanent nature of the construction, you might need building permits or zoning variances.
Q6: What are the basic basketball court dimensions for a half-court?
A6: A common half-court size is 50 feet long by 30 feet wide. This allows for good playability in most backyard settings.
Q7: How do I maintain my basketball court?
A7: Maintenance includes regular sweeping to remove debris, occasional washing, and resealing or recoating as needed depending on the surface material. For concrete or asphalt, keep an eye out for cracks and repair them promptly.
This comprehensive guide should provide you with the knowledge needed to successfully construct your own DIY basketball court. Happy building and happy playing!